In Colour

In Colour
2022 - 2024

Tuesday 28 April 2015

No-black-outline Colouring - Pink & Blue Bird - Gold Coast Convention Swap 2015

In the previous post I showed step-by-step photos of the "no-black-outline" colouring technique. In this this post it's much the same technique (but with a slightly different card) & with bigger pictures to help show the steps I've used a bit better.
Pink & Blue Bird
Stamp Sets:Moon Lake & Wetlands
Card stock: Naturals White, Whisper White, Vellum, Soft Sky & Soft Sky Subtle's dsp
Ink: Old Olive Sahara Sand, Crumb Cake, Soft Sky, Pool Party, Coastal Cabana, Tempting Turquoise, Pacific Point, Blushing Bride, Calypso Coral & White Gel Pen
Tools: Blender Pen, Spiral Boarder Punch & Four Feathers Framelits
Extras: Pool Party Bakers Twine & Antique Brads
Techniques: Sponging, Dauber to stamp & No-black-outline Colouring


Stamp the image in Sahara Sand. Lightly sponge Soft Sky ink over the sky & Pear Pizzazz ink over the ground.
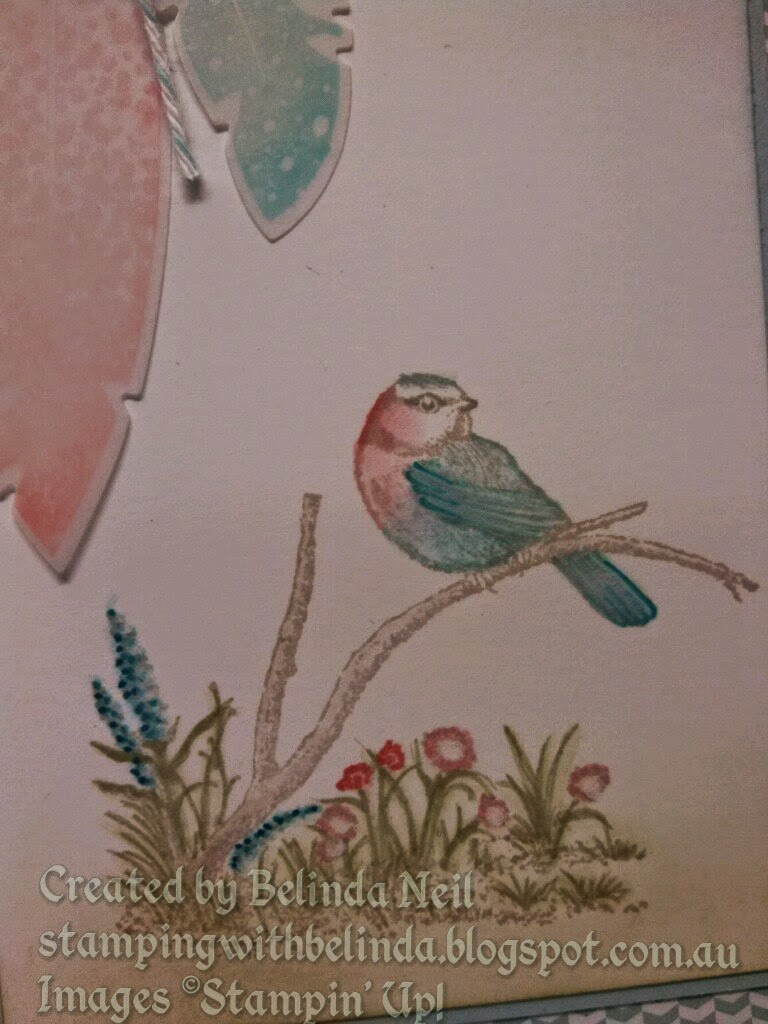
I coloured in the image using a Blender Pen & ink from the lid of the ink pads. 
Sahara Sand for the branch.
Blushing Bride for the chest.

Calypso Coral on the cheek.

\
Coastal Cabana for the birds body, wing, tail & top of the head.
(Coastal Cabana was the colour I used for the first sample I made, but on the swaps I used Soft Sky)

Pacific Point at the top of the wing & tip of the tail.

Old Olive is the colour I used for the grass & leaves here, but on most of the swaps I used Pear Pizzazz.

Crumb Cake for the beak & eye (Swaps were Sahara Sand).

Pool Party for Most of the birds outline (all blue areas). & dot it along the tall flowers.

Blushing Bride on the small flowers & the birds chest.


Calypso Coral on the birds cheek. (I may have added a little bit to the flowers).

Pacific Point, along the side of the tall flowers. 
I used Tempting Turquoise on the top of the wing tip of the tail, on the swaps, but as this was my sample I didn't get a photo. 

Next I used the Blender Pen to soften the image by going over all the marker outlines.


Pink & Blue Bird
Stamp Sets:Moon Lake & Wetlands
Card stock: Naturals White, Whisper White, Vellum, Soft Sky & Soft Sky Subtle's dsp
Ink: Sahara Sand, Soft Sky, Pool Party, Tempting Turquoise, Pacific Point, Pear Pizzazz, Blushing Bride, Calypso Coral & White Gel Pen
Tools: Blender Pen, Spiral Boarder Punch, Itty Bitty Banners & Four Feathers Framelits
Extras: Pool Party Bakers Twine
Techniques: Sponging, Dauber to stamp & No-black-outline Colouring

Monday 27 April 2015

No-black-outline Colouring - Saffron Sky Bird - Gold Coast Convention swaps 2015

Since Blendabilities aren't available, I thought I should try another colouring technique.
No-black-outline Colouring... at least that's what I'm calling it anyway.
So here's a few step-by-step photos & some of my favourite stamps.
Saffron Sky Bird
Stamp Sets: Moon Lake, Hardwood & Everything Eleanor.
Card stock: Soft Sky, So Saffron & Whisper White.
Ink: So Saffron, Soft Sky, Pool Party, Marina Mist, Sahara Sand, Old Olive, Pear Pizzazz & White Chalk Pen.
Tools: 2 ½” Circle Punch & Apothecary Accents Framelits.
Extras: Blender Pen, White Jute Ribbon & White Vellum.
Techniques: Sponging, No-black-outline colouring. 

 The background here is a bit like the "Triple Layer Stamping", except of course without the triple layers.
I've just used the Pool Party Marker to slightly darken the round ends of the flourish that I stamped with Soft Sky.
Here is the full background with a piece of So Saffron card stock added between the Whisper White & the Soft Sky.

 The Sahara Sand ink is a good colour base to see the out of the image without interfering too much with the colours you might want to add.

 I used the Blender Pen & ink (from the lids of the ink pads) to colour the image.

Here you can see the difference of adding the coloured outlines.
The image on the left has no added outline, where as I have added coloured outlines to the image on the right.

 Using the coordinating colours, I outlined the image with the fine tip (thin end) of the markers. This adds some depth & strengthens the colours, making it more of a coloured outline image.

It wasn't until I had made a few feathers on my swaps (using White Jute Ribbon) that I realised they weren't working very well (sorry to anyone who received those ones). So then I thought there's got to be a better way & this is what I came up with. Vellum... why didn't I think of it in the first place, it worked a treat.


Saturday 18 April 2015

Shaker card with gift card pocket inside


 Stamp set: Adventure Awaits
Card stock: Basic Black, Whisper White, Irresistibly Yours dsp & Vellum.
Ink: Pool Party, Coastal Cabana, Bermuda Bay & Memento Black.
Tools: Apothecary Accents Framelits & Stars Decorative Mask.
Extras: Sequins & Washi Tape


I used the piece that was cut out from the front (Apothecary Framelit) to make the pocket.
I just traced the gift card onto the inside of the pocket so I would know where to put adhesive, ( & so the gift card wouldn't get stuck to it).   

I also added some Pool Party twine to the gift card, just for something extra to grab hold of to make it easier to take the gift card out ( I think I had stuck the pocket down just a little bit too tight).


Tuesday 7 April 2015

Pyramid Card & Stay Closed Box - for Easter treats

The most recent class I held was within the week before Easter, so of course I had to include a box for Easter eggs in the projects... & some chocolate eggs to fill them up too. Mmmm : )
Stamp Set: Chalk Talk
Card stock: Wisteria Wonder, Whisper White, Sliver Glimmer, Irresistibly Yours dsp, & Subtles  dsp Stacks
Ink: Wisteria Wonder
Framelits: Chalk Talk & Stars
Ribbon: White Jute & Silver Slim Trim
Punches: Small Star
Extras: Sliver Glitter

 Here you can see the slit in the back of the card. Tucking the corner into the slit helps the card stand up properly. Other sample I've seen have used Velcro to hold the card together.

Colours: Soft Sky, Blushing Bride, So Saffron & Wisteria Wonder
These were the projects that everyone who attended made. I gave everyone a different colour to use which I think was great, it meant we all got to see how they turned out in other colours & I'm so glad I remembered to take a photo before everyone left.

 These are the templates I draw up for everybody to refer to during the class & take home for future reference. Just in case you're wondering why my instructions are a bit vague, it's because I've already shown them how to assemble the project in the class, but know they'll need the measurements written down (I know I forget things if I don't write it down).

 I thought I'd share these pictures too, just because it's Easter. I work in a shop call Party Cupcake where we sell all sorts of cake decorating supplies, so I made some carrots for the shop window, among other chocolate treats. We sell Choc Drops in all different colours, so I thought why not put them in a plastic bag (which I sealed diagonally), tied them up, added a couple of green paper patty pans (which I cut a small hole in the centre), & tied another green ribbon around it to keep it secure.

This isn't a very good photo, I should've taken it from outside the window instead of beside it, but carrots look good on the grass. 

From the Herd - in watercolour

I wanted to make a Birthday card for my cousin Kengee, who's a bit of an outdoorsy person, so I thought what better stamp sets to use than "From the Herd" & "Just Sayin'". I think this stamp set will always be one of my favourites, the characters just look so funny : P
Stamp sets: From the Herd, Just Sayin' & Hardwood
Card Stock: Watercolour, Whisper White & Crumb Cake
Ink: Crumb Cake, Sahara Sand, Soft Suede, Cajun Craze, Blushing Bride, Soft Sky, Pear Pizzazz, Basic Gray, Pumpkin Pie & Crushed Curry
Extras: Burlap Ribbon, Chevron Ribbon Word Bubbles Framelits
Techniques: Watercolouring

Saturday 4 April 2015

Acrylic Block Background Technique

I shared this technique in a class because it's so easy & it is so much fun.
The Acrylic Block Background technique is used on the Whisper White card stock in the middle of the card, while most of the rest is Irresistibly Yours dsp from Sale-a-bration, sponged & stamped in the coordinating colours.
This card has a lemony fresh thing going on, while the card below looks minty fresh : D
Stamp Sets: Adventure Awaits & Kinda Eclectic
Cardstock: Naturals White, Basic Black, Whisper White & Irresistibly Yours.
Ink: Memento Black, Daffodil Delight, Wild Wasabi & Island Indigo.
Extras: White Jute Ribbon & In Colour Sequins
Techniques: Sponging & Acrylic Block Background

Stamp Sets: Adventure Awaits & Kinda Eclectic
Cardstock: Naturals White, Basic Black, Whisper White & Irresistibly Yours.
Ink: Memento Black, Pistachio Pudding Coastal Cabana & Island Indigo.
Extras: White Jute Ribbon & In Colour Sequins
Techniques: Sponging & Acrylic Block Background


You can sponge & stamp whatever you like onto the Irresistibly Yours dsp & it looks great, just remember to use a tissue or paper towel to remove the excess ink from all the clear embossed patterns or it will transfer onto your hands & get messy.


Basic materials for creating the Acrylic Block Background technique.
You will need an acrylic block, Whisper White (or Very Vanilla) card stock, Two or three shades of ink & water in a spray/mister bottle (not in the photo- sorry).

Starting with the lightest colour ( Pistachio Pudding), I inked up roughly half the block directly from the ink pad.


Next I added Coastal Cabana to the other half of the block, directly from the ink pad.

Saving the darkest colour for last, I added Island Indigo with a sponge dauber just to the edge of the Coastal Cabana. I was going for a bit of an ombre look here.
The best thing about using a sponge dauber is you can apply it anywhere on the block, not just on the edge.


I found it helpful to put a piece of paper towel under the block before spraying it with water, just to stop everything else ending up all wet.

I may have gotten a bit carried away with the water here, but if you don't have enough water on the block then you'll end up with patches of white card stock showing through.


Once you place your block onto the white card stock you'll need to wait a moment for all of the water & ink to be absorbed. It doesn't take very long, you'll see it rippling as it transfers from the block to the card stock.

When you remove the block it will be practically clean and dry, if you allowed enough time for the water & ink to be absorbed & if there was enough water to help the ink transfer.
(You can see I had a bit much water on the block as it had dripped onto the card stock)

Now that you have a lovely coloured background, created with your acrylic block, you can stamp whatever you like onto it, just make sure the card stock is dry first or else the stamped image will bleed into the background.
Of course you can use a heat tool to speed up the process if you're like me & can't wait for it to dry...

The card below is using all the same techniques except I've used markers on the block to create the rainbow.
Stamp Sets: Adventure Awaits 
Cardstock: Basic Black, Whisper White & Irresistibly Yours.
Ink: Memento Black, Real Red, Pumpkin Pie, Daffodil Delight, Old Olive, Tempting Turquoise, Rich Razzleberry.
Extras: White Jute Ribbon & Gold Sequin Trim
Techniques: Sponging & Acrylic Block Background

                           
...& of course it was St Patrick's Day, on the day of the workshop, so I made some shamrock biscuits & bought a bunch of green grapes for the occasion.