In Colour

In Colour
2022 - 2024
Showing posts with label Vellum. Show all posts

Thursday, 30 June 2016

Dutch Shutter Fold Card - with Flowering Fields & No Bones About it.

I had seen this style of card on Splitcoaststampers, thought it looked great and wanted to try it out. The card I seen was so cute - it had Snoopy and the red baron on it... but there were no instructions, only that the creator of the card had seen it in a Dutch Hobby Magazine. I tried really hard to find it again to set up a link... but I couldn't find it... Sorry : (
I'll be sure to up date with a link if I do come across it though.

Update: I found the card that inspired these cards (only took ages :D ). 
Here is the link to niki1's cute version on splitcoast.

So, I've given it a go anyway and decided it wasn't to hard to figure out.
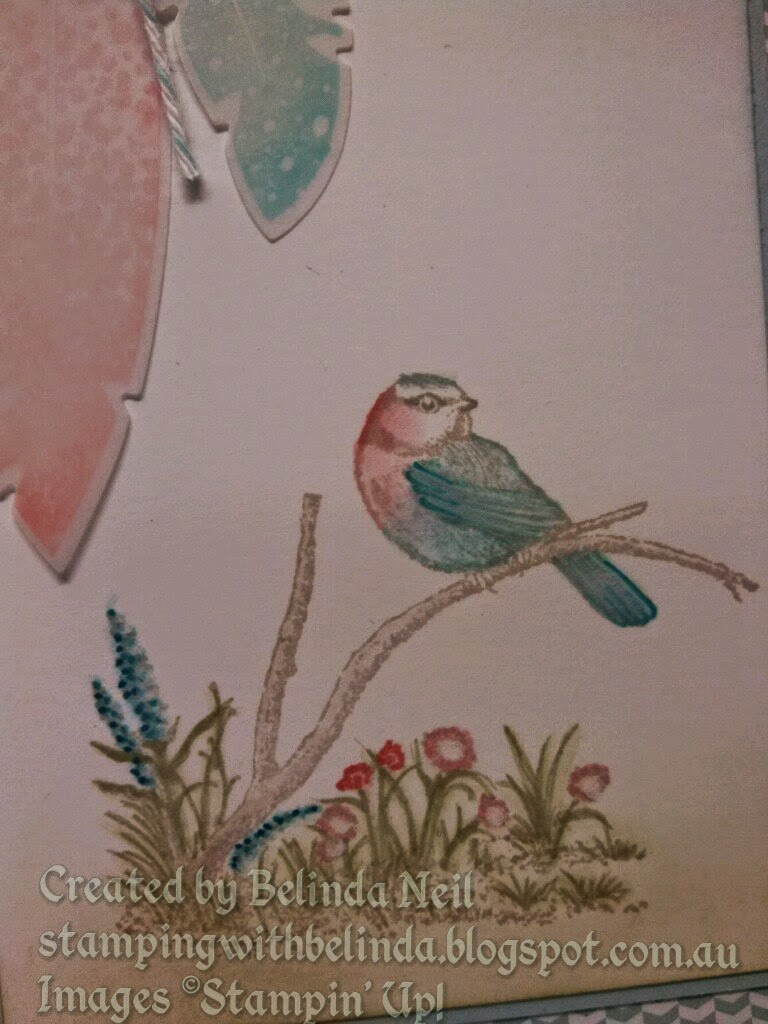
Stamp Set: Flowering Fields
Cardstock: Ivory Naturals
Ink: Sahara Sand, Always Artichoke, Old Olive, Pear Pizzazz, Daffodil Delight, Pumpkin Pie, Real Red, Wisteria Wonder & Blushing Bride
Technique: No black outline  
Extras: Blender Pen & White Gel Pen


This is how the card looks when folded flat to fit in the envelope.


Stamp Set: No Bones About It
Cardstock: Crumb Cake, Early Espresso, Whisper White & Vallum
Ink: Garden Green, Old Olive, Pear Pizzazz, Cucumber Crush, Delightful Dijon, Early Espresso & White Craft
Technques: Distressing 
Extras: Linen Thread


This is the back of the card, I just decided to decorate it too because the stamp set has so many images to play with I thought why not use up all the room.


This how the card looks when fully opened, showing both front and back.


As you can see the card folds nicely flat to fit into an envelope. 

This is a fun card to make and could be decorated in so many ways...
`
Sorry about the quality, I didn't scan the instructions like I normally would, I've just taken a photo instead.

Saturday, 5 December 2015

Vellum with markers & dry embossing

 I had made these cards a little while ago, it's just taken a bit to get them on here.
The images are stamped onto vellum with Black StazOn and coloured with Stampin' Write Markers, then flipped over to press out a small section with a stylus (dry embossing).

Stamp set: Giggle Greetings & Dotty Angles.
Card stock: Bermuda Bay, Island Indigo, So Saffron, Whisper White, dsp & Vellum.
Ink:  Bermuda Bay, Island Indigo, So Saffron & Black StazOn.
Extras: Decorative Dots Embossing Folder, Bermuda Bay Ribbon & Washi Tape.


This close up is to show you that I've dry embossed the candle & the flame.
( it looks better in real life)


Stamp set: Giggle Greetings.
Card stock: Early Espresso, Crumb Cake, Very Vanilla, dsp & Vellum.
Ink: Black StazOn, Crumb Cake, Chocolate Chip, Calypso Coral & White Chalk.
Extras: Decorative Dots Embossing Folder, Dots & Stripes Mask (+Spray), Linen Thread, Natural Ribbon, Burlap & Mini Silver Brads.


I'm not sure if you can see from the photo, but I've dry embossed the ears, eyes nose & tongue.


To dry emboss an image; stamp & colour onto vellum, then turn over and use a stylus to press a small section of the image. It's best to have your stamping foam mat or a foam block underneath the vellum.

The heart on the right has been dry embossed, and though you can't tell from the picture the heart is raised and you can feel the shape of it when you run your finger over the top.


Tuesday, 8 September 2015

Perfect Peacock - In Purple

The colours don't seem to look right in the photos, but turned out really nice in real life.
 The Peacock is embossed in gold onto vellum, then coloured with Stampin' Write Markers.
The Stampin' Write Markers are not quite the same as the Blendabilities (because they are a water based ink, they don't behave the same as an achohol based ink), but using them on the vellum is great, because you can blend  and lighten the colours using the Blender Pen. You can also colour on the front or the back of the vellum depending on the look you want to achieve.
 Stamps: Perfect Peacock & Flowering Flourishes
Cardstock: Blackberry Bliss, Daffodil Delight, Crumb Cake & Vellum
Ink: Versa Mark, Daffodil Delight, Pumpkin Pie, Old Olive, Always Artichoke, Wisteria Wonder, Perfect Plum, Elegant Eggplant, Rich Razzleberry & Calypso Coral
Framelits: Apothecary Accents
Extras: Gold Embossing Powder, Blender Pen & Blackberry Ribbon

 I'm just trying to show how nice the gold embossing powder looks with these colours on the vellum.
(It's always tricky to get a good photo of gold on cards while capturing the other features too)


I layered the vellum onto Daffodil Delight card stock because it went with the colours in the card and gave it a warmer - softer finish.

This card didn't out as good as the other one, but I've used the same basic colours to colour in, except I've embossed with silver onto Whisper White card stock and used the inks to watercolour the image.

Tuesday, 28 April 2015

No-black-outline Colouring - Pink & Blue Bird - Gold Coast Convention Swap 2015

In the previous post I showed step-by-step photos of the "no-black-outline" colouring technique. In this this post it's much the same technique (but with a slightly different card) & with bigger pictures to help show the steps I've used a bit better.
Pink & Blue Bird
Stamp Sets:Moon Lake & Wetlands
Card stock: Naturals White, Whisper White, Vellum, Soft Sky & Soft Sky Subtle's dsp
Ink: Old Olive Sahara Sand, Crumb Cake, Soft Sky, Pool Party, Coastal Cabana, Tempting Turquoise, Pacific Point, Blushing Bride, Calypso Coral & White Gel Pen
Tools: Blender Pen, Spiral Boarder Punch & Four Feathers Framelits
Extras: Pool Party Bakers Twine & Antique Brads
Techniques: Sponging, Dauber to stamp & No-black-outline Colouring


Stamp the image in Sahara Sand. Lightly sponge Soft Sky ink over the sky & Pear Pizzazz ink over the ground.
I coloured in the image using a Blender Pen & ink from the lid of the ink pads. 
Sahara Sand for the branch.
Blushing Bride for the chest.

Calypso Coral on the cheek.

\
Coastal Cabana for the birds body, wing, tail & top of the head.
(Coastal Cabana was the colour I used for the first sample I made, but on the swaps I used Soft Sky)

Pacific Point at the top of the wing & tip of the tail.

Old Olive is the colour I used for the grass & leaves here, but on most of the swaps I used Pear Pizzazz.

Crumb Cake for the beak & eye (Swaps were Sahara Sand).

Pool Party for Most of the birds outline (all blue areas). & dot it along the tall flowers.

Blushing Bride on the small flowers & the birds chest.


Calypso Coral on the birds cheek. (I may have added a little bit to the flowers).

Pacific Point, along the side of the tall flowers. 
I used Tempting Turquoise on the top of the wing tip of the tail, on the swaps, but as this was my sample I didn't get a photo. 

Next I used the Blender Pen to soften the image by going over all the marker outlines.


Pink & Blue Bird
Stamp Sets:Moon Lake & Wetlands
Card stock: Naturals White, Whisper White, Vellum, Soft Sky & Soft Sky Subtle's dsp
Ink: Sahara Sand, Soft Sky, Pool Party, Tempting Turquoise, Pacific Point, Pear Pizzazz, Blushing Bride, Calypso Coral & White Gel Pen
Tools: Blender Pen, Spiral Boarder Punch, Itty Bitty Banners & Four Feathers Framelits
Extras: Pool Party Bakers Twine
Techniques: Sponging, Dauber to stamp & No-black-outline Colouring

Saturday, 18 April 2015

Shaker card with gift card pocket inside


 Stamp set: Adventure Awaits
Card stock: Basic Black, Whisper White, Irresistibly Yours dsp & Vellum.
Ink: Pool Party, Coastal Cabana, Bermuda Bay & Memento Black.
Tools: Apothecary Accents Framelits & Stars Decorative Mask.
Extras: Sequins & Washi Tape


I used the piece that was cut out from the front (Apothecary Framelit) to make the pocket.
I just traced the gift card onto the inside of the pocket so I would know where to put adhesive, ( & so the gift card wouldn't get stuck to it).   

I also added some Pool Party twine to the gift card, just for something extra to grab hold of to make it easier to take the gift card out ( I think I had stuck the pocket down just a little bit too tight).