I had a lot of fun playing with the Woodland embossing folder and I think everyone in the class did too. The Navy Christmas card was the class project.
Stamp sets: Lovely as a Tree & Oh What Fun
Cardstock: Whisper White, Sahara Sand & Naturals White
Ink: Garden Green, Always Artichoke, Cherry Cobbler & Sahara Sand
Tools: Rubber Brayer, Decorative Label Punch & Woodland Embossing Folder
Extras: Linen Thread
Note: The ink has been brayered onto the Woodland Embossing Folder for this card
Stamp sets: Wetlands
Cardstock: Whisper White, Smoky Slate & Sweet Sugarplum
Ink: Sweet Sugarplum, Flirty Flamingo, Peekaboo Peach, Daffodil Delight & Smoky Slate
Tools: Rubber Brayer Circle Punch & Woodland Embossing Folder
Extras: Sweet Sugarplum Ruched Ribbon
Stamp sets: Lovely as a Tree & Oh What Fun
Cardstock: Whisper White, Sahara Sand & Mossy Meadow
Ink: Marina Mist, Always Artichoke & Sahara Sand
Tools: Rubber Brayer, Circle Punch & Woodland Embossing Folder
Extras: Linen Thread
Note: The ink has been brayered onto the Woodland Embossing Folder for this card
The next few cards almost look the same, but because this was the card we made for the class project each one I made turned out a little bit different. So I thought I would show them all anyway, just so you could see that if you want something like a moon in the background, with mistletoe/holly dangling in front of it -while hanging from a branch, then you need to think about placement a little bit before embossing.
Stamp sets: Lovely as a Tree & Oh What Fun
Cardstock: Whisper White, Marina Mist & Night of Navy
Ink: Marina Mist, Night of Navy & Dapper Denim
Tools: Rubber Brayer, Circle Punch & Woodland Embossing Folder
Extras: White Gel Pen
Stamp sets: Lovely as a Tree & Oh What Fun
Cardstock: Whisper White, Marina Mist & Night of Navy
Ink: Marina Mist, Night of Navy & Dapper Denim
Tools: Rubber Brayer, Circle Punch & Woodland Embossing Folder
Extras: White Gel Pen
Stamp sets: Lovely as a Tree & Oh What Fun
Cardstock: Whisper White, Marina Mist & Night of Navy
Ink: Marina Mist, Night of Navy & Dapper Denim
Tools: Rubber Brayer, Circle Punch & Woodland Embossing Folder
Extras: White Gel Pen
Stamp sets: Lovely as a Tree & Oh What Fun
Cardstock: Whisper White, Wisteria Wonder, & Night of Navy
Ink: Marina Mist, Night of Navy, Wisteria Wonder & Dapper Denim
Tools: Rubber Brayer, Circle Punch & Woodland Embossing Folder
Extras: White Gel Pen & Staple
Stamp sets: Lovely as a Tree & Wetlands
Cardstock: Whisper White, Basic Black & Always Artichoke
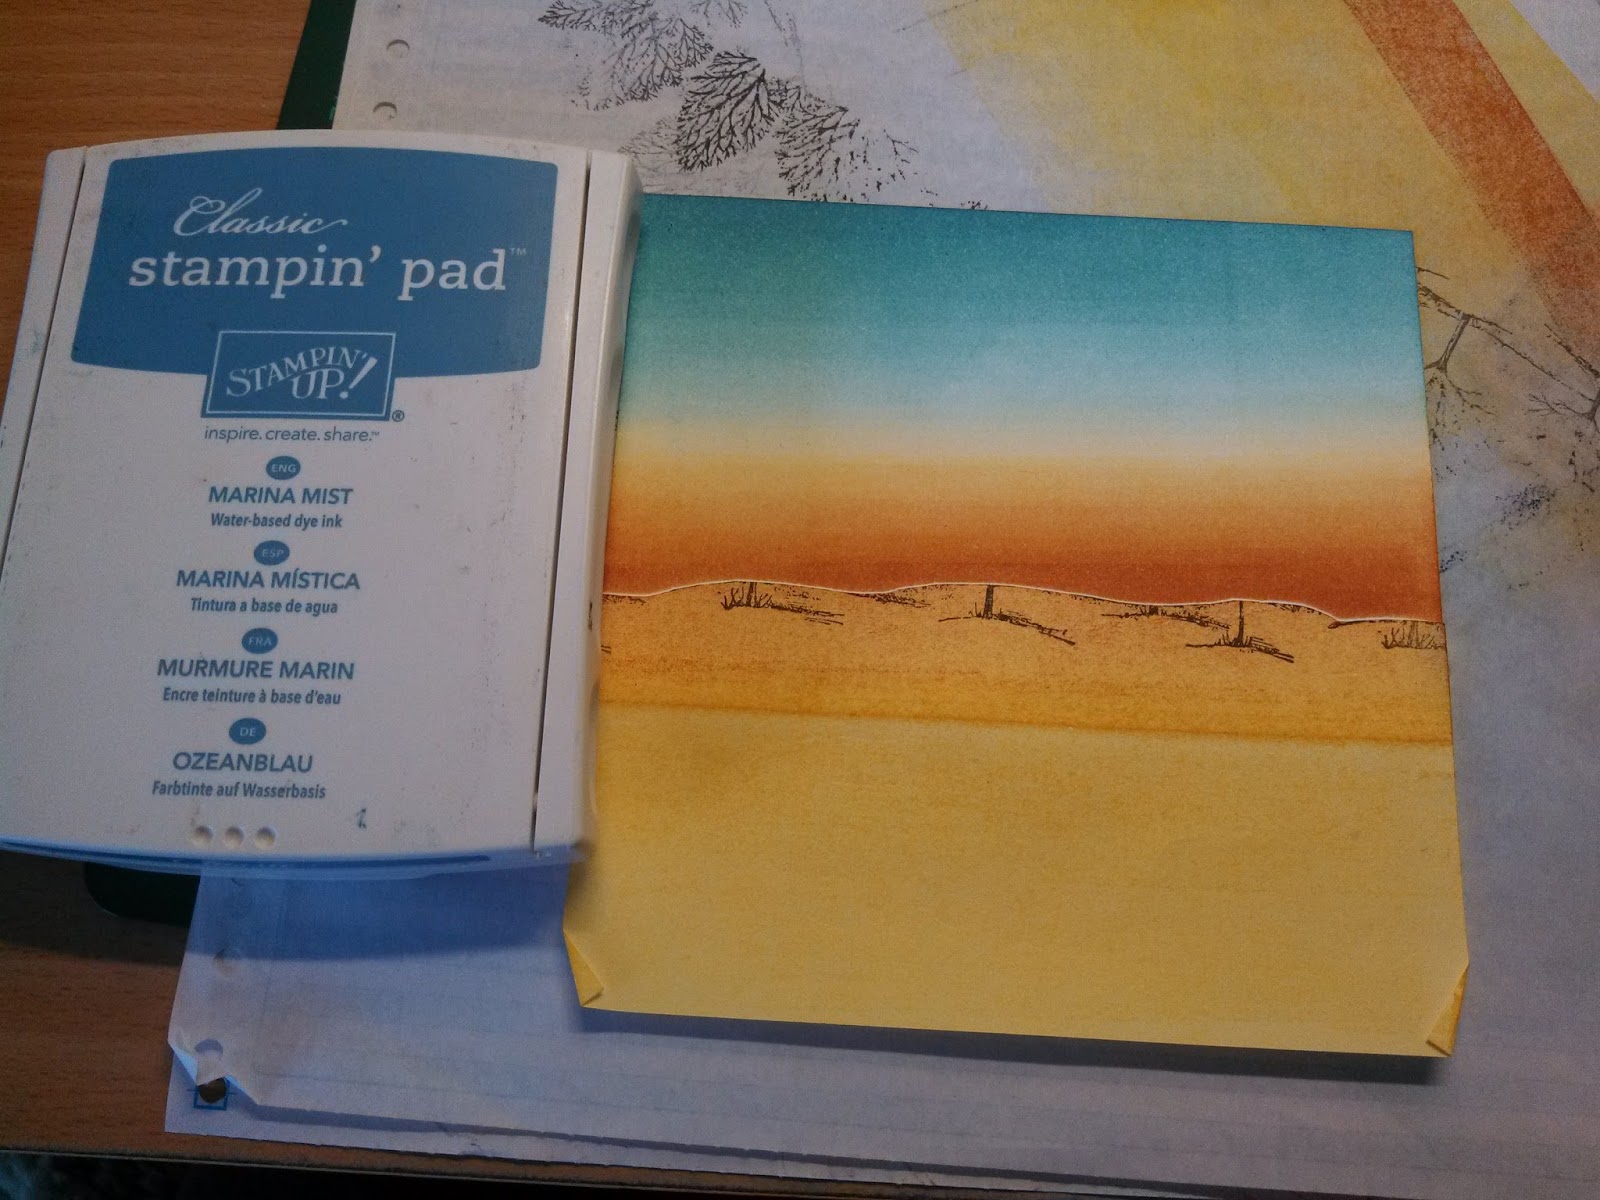
Ink: Daffodil Delight, Cajun Craze, Soft Sky, Marina Mist, Pacific Point, Always Artichoke, Memento & Tip Top Taupe
Tools: Rubber Brayer & Woodland Embossing Folder
Make a mask by stamping the row of trees on a sticky-note and cutting along the horizon.
Place the mask on the bottom of a piece of Whisper White Cardstock, leaving enough room at the bottom for some green ground.
Add some Daffodil Delight ink to the Brayer (you only need to ink up about half way across). Then apply in one direction rolling all the way across the page and working your way gradually so the colour fades as the ink runs out. (This can take some practice if you're new at it - just keep rolling)
Next add some Cajun Craze ink to the brayer, you wont need much, probably about an inch across the brayer. Repeat the first step of rolling, but try to keep most of the colour concentrated on the horizon. The trick is don't add to much ink to the brayer to begin with, remember you can always add more...
I just used a wet wipe to remove the left over Cajun Craze ink from the brayer.
I don't want the darker colour to stain the lighter coloured ink pad.
Apply another layer of Daffodil Delight to help get a nicer blend.
Clean all the orange and yellow inks off the brayer before changing colour.
Apply Soft Sky ink along the top of the sky working your way down towards the horizon.
Try not to overlap these colours to much or it might start to look a little green.
Add some Marina Mist to the sky but don't take it down quite all the way.
Sometimes when I'm adding a few colours to one area to achieve a graduation of tone, I'll add the colours in layers on the brayer, starting with the lightest to darkest.
Pacific Point is the darkest of the blues here, but there is only small amount at the top, then it blends into the other blues.
Remove the mask.
Put the opposite side of the mask on, to cover the sky this time.
Use the brayer to apply plenty of Always Artichoke ink to the ground.
Remove the mask.
Use Memento Black ink to stamp the row of trees onto the Woodland embossing folder.
Stamp onto the side with the Sizzix and Stampin' Up! logos on it, so that the stamped trees will land behind the embossed trees.
Position the brayered cardstock inside the Woodland embossing folder. If you have the stamped side up you will be able to see through the folder and line up the stamped trees with brayered horizon.
Run it through the Big Shot with appropriate plates.
Ink up the Brayer with Tip Top Taupe and very gently roll over the embossed trees. You may need to repeat this step quite a few times, but take it easy or the ink will end up all over the background too.
You can always use a marker in the coordinating colour to touch up any bits the brayer can not reach.
I decided to fill in all the extra little bits of the trees with a Marker so you couldn't see the background through them.