In Colour

In Colour
2022 - 2024
Showing posts with label Four Feathers. Show all posts

Tuesday, 28 April 2015

No-black-outline Colouring - Pink & Blue Bird - Gold Coast Convention Swap 2015

In the previous post I showed step-by-step photos of the "no-black-outline" colouring technique. In this this post it's much the same technique (but with a slightly different card) & with bigger pictures to help show the steps I've used a bit better.
Pink & Blue Bird
Stamp Sets:Moon Lake & Wetlands
Card stock: Naturals White, Whisper White, Vellum, Soft Sky & Soft Sky Subtle's dsp
Ink: Old Olive Sahara Sand, Crumb Cake, Soft Sky, Pool Party, Coastal Cabana, Tempting Turquoise, Pacific Point, Blushing Bride, Calypso Coral & White Gel Pen
Tools: Blender Pen, Spiral Boarder Punch & Four Feathers Framelits
Extras: Pool Party Bakers Twine & Antique Brads
Techniques: Sponging, Dauber to stamp & No-black-outline Colouring


Stamp the image in Sahara Sand. Lightly sponge Soft Sky ink over the sky & Pear Pizzazz ink over the ground.
I coloured in the image using a Blender Pen & ink from the lid of the ink pads. 
Sahara Sand for the branch.
Blushing Bride for the chest.

Calypso Coral on the cheek.

\
Coastal Cabana for the birds body, wing, tail & top of the head.
(Coastal Cabana was the colour I used for the first sample I made, but on the swaps I used Soft Sky)

Pacific Point at the top of the wing & tip of the tail.

Old Olive is the colour I used for the grass & leaves here, but on most of the swaps I used Pear Pizzazz.

Crumb Cake for the beak & eye (Swaps were Sahara Sand).

Pool Party for Most of the birds outline (all blue areas). & dot it along the tall flowers.

Blushing Bride on the small flowers & the birds chest.


Calypso Coral on the birds cheek. (I may have added a little bit to the flowers).

Pacific Point, along the side of the tall flowers. 
I used Tempting Turquoise on the top of the wing tip of the tail, on the swaps, but as this was my sample I didn't get a photo. 

Next I used the Blender Pen to soften the image by going over all the marker outlines.
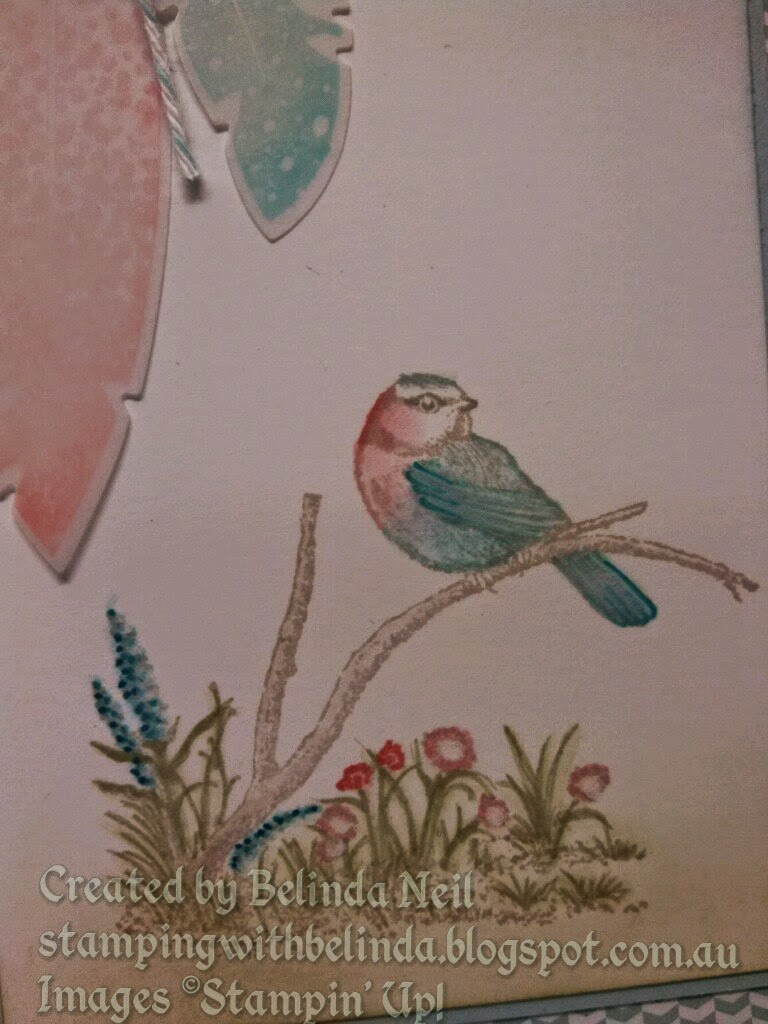


Pink & Blue Bird
Stamp Sets:Moon Lake & Wetlands
Card stock: Naturals White, Whisper White, Vellum, Soft Sky & Soft Sky Subtle's dsp
Ink: Sahara Sand, Soft Sky, Pool Party, Tempting Turquoise, Pacific Point, Pear Pizzazz, Blushing Bride, Calypso Coral & White Gel Pen
Tools: Blender Pen, Spiral Boarder Punch, Itty Bitty Banners & Four Feathers Framelits
Extras: Pool Party Bakers Twine
Techniques: Sponging, Dauber to stamp & No-black-outline Colouring

Sunday, 23 November 2014

Phoenix - Perfect Peacock

Ok, so it was my Good friend Shari's Birthday again, and it seems every year on her birthday there's a movie released that we go and see. The last couple of years it's been "The Hunger Games" and "Catching Fire", so this year it was "Mockingjay part 1". Now I know peacocks and phoenix are not quite mockingjays, but phoenix are a fire birds and Shari likes red... so it was close enough.
Stamp sets: Perfect Peacock, Good Greetings & Four Feathers.
Card Stock: Cherry Cobbler, Basic Black & Whisper White.
Ink: Memento Tuxedo Black, Daffodil Delight, Pumpkin Pie, Calypso Coral & Cherry Cobbler.
Blendabilities:  Daffodil Delight, Pumpkin Pie, Calypso Coral, Cherry Cobbler, Melon Mambo & Old Olive.
Extras: Washi Tape, Gold Glitter & Gold Sequins.

Here you can see the gold glitter & sequins shine.
I didn't put the gold sequins on every eye of the tale because I thought it might be too much, but then needed some more somewhere (the bottom) else, for some balance.

I used Melon Mambo as the lightest colour to finish the body & wing, I found that it gave it more of a crimson red (not that you can tell from the photo).

Shari said she wanted Lemon Meringue Pie for her birthday cake, so I made it then added a little Mockingjay, which I made out of modeling chocolate & painted with edible gold paint. It was the first time I have made modeling chocolate & found a little tricky to work with, probably due to the warm weather we had.

Thursday, 9 October 2014

Slider Cards

These Slider cards were really easy and so much fun to make... I love these cards at the moment, I'm sure you can tell when you see them all. Though I must admit I am missing one from the collection, which I left behind for some to use as a guide (it was was one of my favourites too).
So of course I did use this card for a workshop project, and yes...everyone loved it!

No, this wasn't the workshop project, though I did bring it along to show the versatility of the card.
I Just loved the idea of putting the car on the slider and now I'd have to say this is probably my most favourite one.
(This is not my stamp set by the way, I borrowed it from my wonderful friend Shari, who shares everything, lucky for me)

Stamps: White Christmas
Card Stock: Whisper White & Pool Party
Blendabilities: Cherry cobbler, Old Olive, Night of Navy, Crumb Cake & Smoky Slate.
Ink: Pool Party & Tuxedo Black Memento
Techniques: Masking, Sponging & Colouring ( Belndabilities)

Stamps: Endless Wishes
Colours: Pool Party, Whisper White & Silver
Extras: Labels Collection Framelits, Frosted Sequins, All is Calm dsp & Washi tape.
Techniques: Embossing,  & Piercing

Stamps: Endless Wishes
Colours: Lost Lagoon,  Pool Party, Whisper White & Silver
Extras: Labels Collection Framelits, Frosted Sequins, All is Calm dsp & Washi tape.
Techniques: Embossing,  & Piercing

Stamps: Four Feathers & Sassy Salutations
Colours: Smoky Slate, Whisper White, Soft Sky & Sliver.
Framelits: Four Feathers & Apothecary Accents.
Extras: Clear Buttons, Silver embossing powder & silver ribbon.
 + Print Poetry dsp
Techniques: Embossing,  Masking & Sponging.

This was actually the  very first one of these I made, & I'm sure you can tell, it's very basic.
Stamps: Sassy Salutations & Holiday Homes.
Colours: Cherry Cobbler, Very Vanilla, Early Espresso & Gold
Extras: Apothecary Accents Framelits, Gold embossing powder & Print Poetry dsp.
Techniques: Embossing

This was the first one I started to experiment with (by "experiment" I mean adding embellishments other than a greeting to the moving/sliding tab).
Stamps: Holiday Homes
Card stock: Basic Black, Whisper White & Garden Green.
Ink: Tuxedo Black- Memento, Night of Navy, Daffodil Delight, Versa- Mark & White Craft.
Blendabilities: Daffodil Delight, Old Olive & Cherry Cobbler.
Extras: Holiday Homes framelits, Clear Embossing Powder & White Embossing Powder.
Techniques: Embossing, Brayering, Masking & Sponging.

This one seemed like a good idea at the time... but I didn't quite pull it off, I guess that's what happens when you stay up too late working on the wrong projects : /
Stamps: Holiday Homes, Lovely as a Tree & Good Greetings.
Colours Basic Black Whisper White, Night of Navy & Daffodil Delight.
Framelits: Holiday Homes & Chalk Talk.
Techniques: Masking & Sponging.
I just wanted to mention here that if you want to save on card stock just cut the length of card to 8 1/4" instead of 81/2". This way you'll get two out of a sheet of A4. You will need change one other measurement though, instead of cutting the slot 1 1/2" from the edge you'll cut 1 1/4", you'll also have a smaller section to stick the card together with ( 1/4" instead of 1/2"). I found changing to these measurements was quite easy to adjust. I just wish I had thought of it before I had drawn up the measurements and instructions...


Dawn's Stamping Studio - Slider card Video

Friday, 26 September 2014

Three Tier Slider Card

Seen these card on the net and thought they were great. There were a few different types out there, but decided to try this one & of course my new stamp set "Four Feathers" : D
Stamps: Four Feathers & Endless Wishes.
Colours: Crumb Cake, Very Vanilla, Pool Party, Island Indigo & Basic Gray.
Tools: Four Feathers Framelits & The roof top of one of the house from- Holiday Homes.
Extras: Gold Button, Natural Chevron Ribbon, Linen Thread & All is Calm washi tape.

I left room on the middle tier for writing a message.

I also used the feather framelits to cut out some sticky notes to make a mask for sponging.
On this top tier I sponged inside the middle feather with Crumb Cake. On the 2nd tier I sponged outside the top feather.

I seen a card on pinterest by Krista Frattin that had the feathers stamped this way, so I couldn't resist trying this technique with the feathers myself.
It's like the rock & roll technique, but after inking up the stamp in the light colour you use a sponge dauber to add the darker colour around the edges. The good thing about this technique is you can be more precise with the dauber when adding the darker colour. You just need to play around to get the intensity right.


Stamps: Holiday Homes
Colours: (I think I've used too many too name...) Raspberry Ripple, Whisper White, Gumball Green, Smokey Slate, Pumpkin Pie, Summer Starfruit, Soft Sky, Marina Mist & Night of Navy.
Extras: Black Embossing Powder, Sponges & Aqua Painter.

I sponged each tier with a different shade of blue hoping it would look like day to night, night being top tier with Santa flying by the moon.

This one was for my friends son who loves The Tigers. It took a while to try and figure out how to make the tigers face, & I know there was a fantastic tiger card on stampinconnection, but it may have been done with a proper cutter.
Stamps: Gorgeous Grunge, Bitty Banners & Back to Basics Alphabet.
Colours: Basic Black, Hello Honey, Whisper White, Raspberry Ripple & Old Olive + Daffodil Delight Blendabilities.
Punches: Two Step Bird, Curly Label, old Butterfly, Elegant Butterfly & Owl Builder.
+ Crystal Effects on the eyes.