In Colour

In Colour
2022 - 2024
Showing posts with label Colouring Technique. Show all posts

Tuesday, 28 April 2015

No-black-outline Colouring - Pink & Blue Bird - Gold Coast Convention Swap 2015

In the previous post I showed step-by-step photos of the "no-black-outline" colouring technique. In this this post it's much the same technique (but with a slightly different card) & with bigger pictures to help show the steps I've used a bit better.
Pink & Blue Bird
Stamp Sets:Moon Lake & Wetlands
Card stock: Naturals White, Whisper White, Vellum, Soft Sky & Soft Sky Subtle's dsp
Ink: Old Olive Sahara Sand, Crumb Cake, Soft Sky, Pool Party, Coastal Cabana, Tempting Turquoise, Pacific Point, Blushing Bride, Calypso Coral & White Gel Pen
Tools: Blender Pen, Spiral Boarder Punch & Four Feathers Framelits
Extras: Pool Party Bakers Twine & Antique Brads
Techniques: Sponging, Dauber to stamp & No-black-outline Colouring


Stamp the image in Sahara Sand. Lightly sponge Soft Sky ink over the sky & Pear Pizzazz ink over the ground.
I coloured in the image using a Blender Pen & ink from the lid of the ink pads. 
Sahara Sand for the branch.
Blushing Bride for the chest.

Calypso Coral on the cheek.

\
Coastal Cabana for the birds body, wing, tail & top of the head.
(Coastal Cabana was the colour I used for the first sample I made, but on the swaps I used Soft Sky)

Pacific Point at the top of the wing & tip of the tail.

Old Olive is the colour I used for the grass & leaves here, but on most of the swaps I used Pear Pizzazz.

Crumb Cake for the beak & eye (Swaps were Sahara Sand).

Pool Party for Most of the birds outline (all blue areas). & dot it along the tall flowers.

Blushing Bride on the small flowers & the birds chest.


Calypso Coral on the birds cheek. (I may have added a little bit to the flowers).

Pacific Point, along the side of the tall flowers. 
I used Tempting Turquoise on the top of the wing tip of the tail, on the swaps, but as this was my sample I didn't get a photo. 

Next I used the Blender Pen to soften the image by going over all the marker outlines.
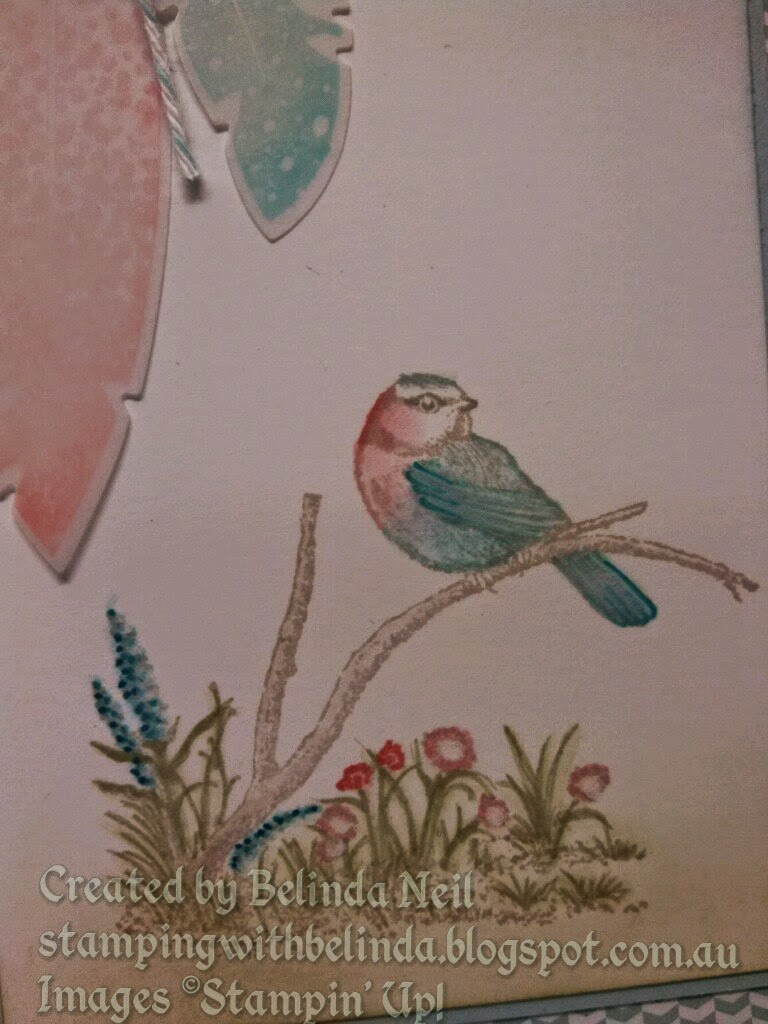


Pink & Blue Bird
Stamp Sets:Moon Lake & Wetlands
Card stock: Naturals White, Whisper White, Vellum, Soft Sky & Soft Sky Subtle's dsp
Ink: Sahara Sand, Soft Sky, Pool Party, Tempting Turquoise, Pacific Point, Pear Pizzazz, Blushing Bride, Calypso Coral & White Gel Pen
Tools: Blender Pen, Spiral Boarder Punch, Itty Bitty Banners & Four Feathers Framelits
Extras: Pool Party Bakers Twine
Techniques: Sponging, Dauber to stamp & No-black-outline Colouring

Monday, 27 April 2015

No-black-outline Colouring - Saffron Sky Bird - Gold Coast Convention swaps 2015

Since Blendabilities aren't available, I thought I should try another colouring technique.
No-black-outline Colouring... at least that's what I'm calling it anyway.
So here's a few step-by-step photos & some of my favourite stamps.
Saffron Sky Bird
Stamp Sets: Moon Lake, Hardwood & Everything Eleanor.
Card stock: Soft Sky, So Saffron & Whisper White.
Ink: So Saffron, Soft Sky, Pool Party, Marina Mist, Sahara Sand, Old Olive, Pear Pizzazz & White Chalk Pen.
Tools: 2 ½” Circle Punch & Apothecary Accents Framelits.
Extras: Blender Pen, White Jute Ribbon & White Vellum.
Techniques: Sponging, No-black-outline colouring. 

 The background here is a bit like the "Triple Layer Stamping", except of course without the triple layers.
I've just used the Pool Party Marker to slightly darken the round ends of the flourish that I stamped with Soft Sky.
Here is the full background with a piece of So Saffron card stock added between the Whisper White & the Soft Sky.

 The Sahara Sand ink is a good colour base to see the out of the image without interfering too much with the colours you might want to add.

 I used the Blender Pen & ink (from the lids of the ink pads) to colour the image.

Here you can see the difference of adding the coloured outlines.
The image on the left has no added outline, where as I have added coloured outlines to the image on the right.

 Using the coordinating colours, I outlined the image with the fine tip (thin end) of the markers. This adds some depth & strengthens the colours, making it more of a coloured outline image.

It wasn't until I had made a few feathers on my swaps (using White Jute Ribbon) that I realised they weren't working very well (sorry to anyone who received those ones). So then I thought there's got to be a better way & this is what I came up with. Vellum... why didn't I think of it in the first place, it worked a treat.