I recently participated in a small group swap, relating to the new catalogue & products.
I don't have a lot of really new stuff yet (only things I have borrowed from my friend. Thanks Shari).
So I seen some under water pictures & thought I'd try it out with Stampin' Up's stamp set "By the Tide".
 |
| Stamp sets: By the Tide & Sassy Salutations. |
 |
| I prepared my Whisper White card stock with an embossing buddy. |
 |
| Ink up the coral stamp from "By the tide", in Versa Mark. |
 |
| Then add Calypso Coral ink. |
 |
| Stamp onto card stock. |
 |
Clean the stamp & repeat first with Versa Mark then with summer starfruit ink.
Remember to make sure your stamps are clean before using them on your Versa Mark ink pad. |
 |
| I used the top & tail of the lobster stamp at the bottom in Gumball Green, with the intention of resembling grass & sea weed. |
 |
| I used the speckled stamp from "Gorgeous Grunge" in Versa Mark, to add bubbles to the scene. |
 |
| Sprinkle with clear embossing powder. |
 |
| Use the heat tool to set. |
 |
| Stamp the sea horse from "By the Tide" in the Versa Mark to colour process, using Daffodil Delight & Strawberry Slush. |
 |
| Stamp the fish in Versa Mark, & Island Indigo. |
 |
| Add more embossing powder. |
 |
| Heat to set. |
 |
This is just to show you the stamps & colours I used.
Gumball Green, Island Indigo, Strawberry Slush, Daffodil Delight, Summer Starfruit, Calypso Coral & Versa Mark. |
 |
I used a mask to create the surface of the water & Horizon of the sky, by tearing a piece of paper in half.
If you use the top piece for the water & the bottom for the sky they should almost match up.
Ink colours for the water: Pool Party, Tempting Turquoise & Pacific Point. |
 |
I started with Pool Party ink, sponging down in a sweeping motion to avoid messing up the torn paper mask.
You can work your way into the centre using a circular motion.
The clear embossed stamps will resist the ink. |
 |
| Next colour, Tempting Turquoise. Again use a down ward sweep when sponging over the mask. Try to concentrate this colour under & around the Pool Party, as the water deepens( you can use a circular motion when your not sponging over the mask). Remember to tap off the excess ink before applying to the card stock to avoid the grainy look of the ink. This helps to keep the sponged ink looking soft & smooth. |
 |
Pacific Point is the deepest of the blues, so it help the water to become deeper too.
Sponge around the bottom & the edges in a circular motion. |
 |
| You can always go back & add more of the lighter blues to help them blend together. |
 |
| Use the other half of the torn paper mask to place at the water surface & sponge the sky in Marina Mist ink. |
 |
| This time sweep the sponge up to avoid messing up the torn paper mask. |
 |
Try to concentrate most of the colour at the top & around the edges. Think of the real sky, it's always a deeper blue high & above, but much lighter on the horizon.
I stamped my sentiment here, but forgot to take a photo....Oops..
|
 |
| Mount onto Pacific Point & Baked Brown Sugar card stock. |
 |
| I attempted to bleach the fish (with bleach in my aqua painter) so that I could add another colour. But I think the bleach in my aqua paint was running out, & I had none left. |
 |
Same with the sea horses. Although you might be able to see the blue is lighter in the sea horses.
|
 |
Stamp the words from "By the Tide" in Baked Brown Sugar ink onto Baked Brown Sugar card stock.
It helps if the Brown Sugar card stock is wider than the card stock of the water scene. |
 |
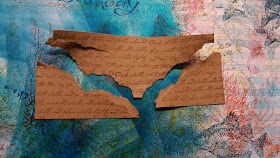
Tear the bottom corners off to create the rocks at the bottom of the water/card.
I liked mine to over lap a little bit, once on the card. |
 |
| Mist with water to help soften card stock. |
 |
| Crumple card stock by screwing it up until your happy with it. |
 |
| Sponge a little Baked Brown Sugar ink onto the cs rocks. |
 |
| Glue the cs rocks onto the card. |
 |
Rock & Roll the shell.
First ink up the shell in Crisp Cantaloupe ink, then roll edges of the stamp onto the calypso carol ink pad. |
 |
Rock & Roll Shells.
I'm not sure if you can see properly in the photo, but the shell is darker on the outside. |
 |
| Fussy cut the shell. |
 |
| Spritz with some shimmer. I used White Frost. Let it dry. |
 |
Glue the shell onto the card. I liked the idea that it looks like the bubbles are coming from the shell.
Oh...I also added a pearl to the shell later, but forgot to take a photo of that too... Sorry. |


